All Facebook ad accounts have one pixel associated with it. You can use the code on multiple websites and add up to 20 custom conversions to your ad account.
Installing the Pixel
Start in the Ads Manager and click Tools. A dropdown menu will appear, click on Pixels.

Once in the Pixel tab, click on Actions and choose View Pixel Code. A pop-up box will appear and you can copy the pixel code. You'll paste the code on your website between the main head tags.
![]()
![]()
Choosing a Conversion Tracking Method
Next, you need to choose the way you'll track conversions. You'll be tracking actions from Facebook ads; the pixel doesn't work for regular posts. To be able to track conversions, you'll need to have the pixel code on your website and a landing page where users are sent after completing an action. Facebook will then know when the action was completed and it can connect the action with the specific ad.
You can track conversions two ways: standard events and custom conversions.
Standard event method
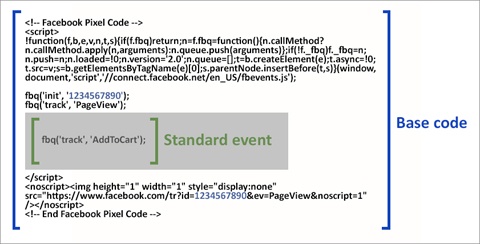
On the pages you want to track, add a line of code to the base code you have already installed after the Page View standard code. Standard Event codes that Facebook currently has include Add to Cart, Initiate Checkout, Make Purchase and Complete Registration.

Note: The text in blue will be your pixel number. The standard event code does not contain brackets; this is just to highlight where it goes.
CUSTOM CONVERSION METHOD
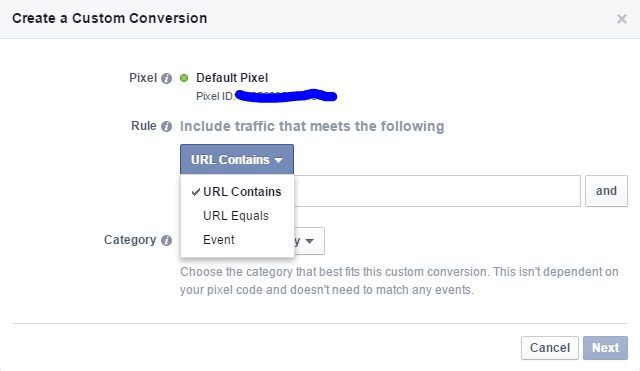
With custom conversions, you can track conversions without adding extra code to your site. To create a custom conversion, in the Ads Manager select Tools and then Custom Conversions. Click on the button that says Create Custom Conversion. A popup box will appear and you will add the rule you want to track and the category.

After filling out the needed info and clicking next, you can name your conversion and add a description if you'd like. Your custom conversion is now ready to be used!
Creating A Website Conversion Ad
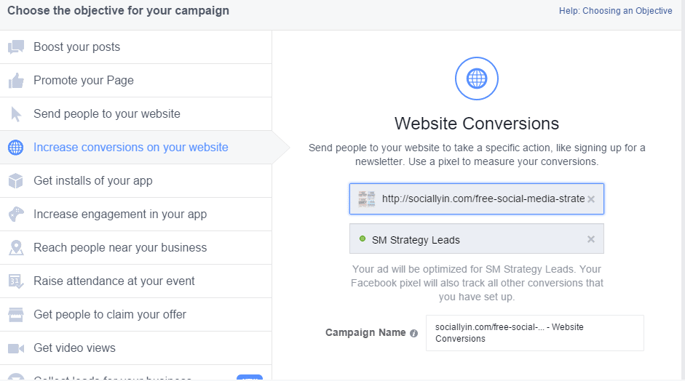
The objective you will choose is 'Increase conversions on your website'. Enter the URL where users will be sent. Then choose the conversion you'd like to use.

After this, you will set up your ad as usual.
Viewing Conversions
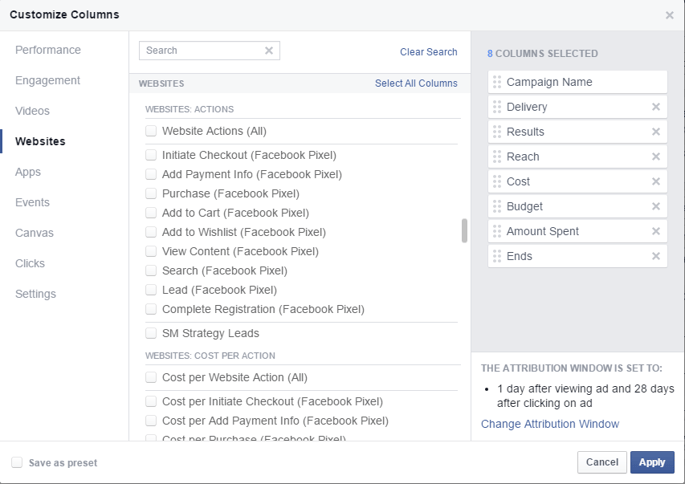
When viewing the report, you will probably be better off customizing the columns so you see the data that you care about. To do this, click on the Columns tab and choose Customize Columns. Choose the stats you want to see and click on the website section.

Be sure to also select the same pixels you chose in previous sections under Websites: Cost Per Action so you can see how much each conversion is costing you. Click Apply and your report will appear. You can save your customized columns for future use as well.
Now you can begin split testing ads and optimizing your budget to focus on what works for you.
Do you have experience with Facebook pixels? Let us know what you think!


Your Comments :